In this blog post we will show you how you can add a setup wizard of your app to the default Assisted Setup (ID: 1801) page. This is particular useful to know which apps are installed in your Business Central and if they are setup properly. Having a page that shows this information enhances the user experience and creates a single centralized setup hub.
Here is the full code for you to copy and adapt to your app.
codeunit 50000 "AddWizardToAssistedSetup"
{
    [EventSubscriber(ObjectType::Codeunit, Codeunit::"Guided Experience", 'OnRegisterAssistedSetup', '', false, false)]
    local procedure AddSetupWizard()
    var
        AssistedSetup: Codeunit "Guided Experience";
    begin
        AssistedSetup.InsertAssistedSetup(TitleTxt, ShortTitleTxt, DescriptionTxt, 10, ObjectType::Page, Page::"Your Setup Wizard",
                        "Assisted Setup Group"::"BYD BeyondIT",            YouTubeLinkLbl,
                        "Video Category"::"BYD BeyondIT App",
                        HelpUrlLbl);
    end;

    var
        // App name
        TitleTxt: Label 'Beyond Reports';
        // Short title
        ShortTitleTxt: Label 'Template based Report Designer';
        // Description of your app.
        DescriptionTxt: Label 'Design template based reports. Customize you reports with various elements and information.';
        // Link to your DOCS or a corresponding help page.
        HelpUrlLbl: Label 'https://docs.beyond365.de/en-US/reports/index.html';
        // Embedded Link to a video for this app.
        YouTubeLinkLbl: Label 'https://www.youtube.com/embed/…';
}
The following will explain a bit the thinking behind this code.
Labels
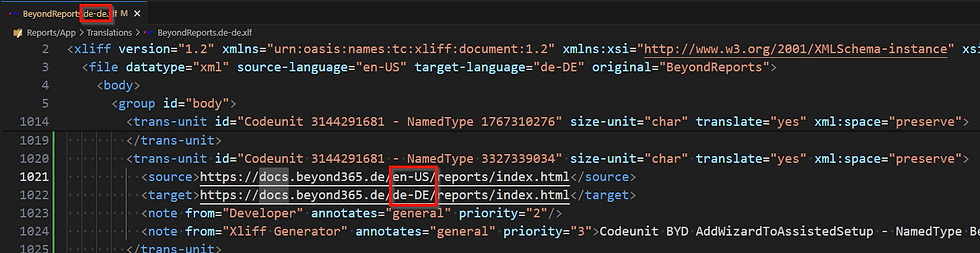
We used labels to be able to translate the text contents into different languages. We also chose a label for the HelpUrl to be able to redirect the user on the Assisted Setup page to the corresponding DOCS (help and documentation) in the current language. This is done with a translation file of the app. Just change the translation of the label in the target language XLF file as you can see here:
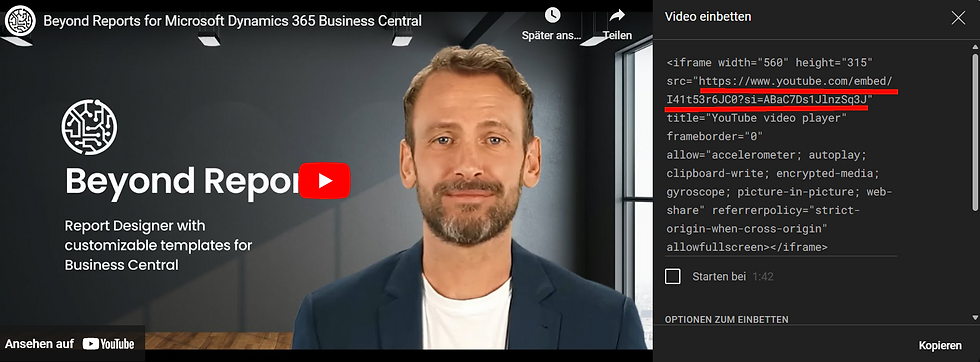
You can do the same with the Youtube link if you want to support a specific video in a different language but remember that you must insert the embedded youtube link on the label so that it works. If you simply copy and paste the link from the address bar of your browser it is not going to work later.
Open youtube and navigate to the video you want to add to the Assisted Setup page for your setup wizard.
Click on Share in the video menu.
Choose the Embedd option.
Copy the embedded link from the src (highlighted in red here).
Enum Extensions
We add two enum extension. Reason for this is that we want to create our own group in the Assisted Setup page in which all setup wizards are gathered. If you have something like a base app (all other apps have a dependency to this app) it is a good idea to store those enum extension in this base app instead of the app (or more precise the setup wizard fo the app) you want to add to the Assisted Setup page.
To create your own group in the Assisted Setup page you need to create an enum extension.

enumextension 50000 "BYD AssistedSetupGroupBeyond" extends "Assisted Setup Group"
{
    value(50000; "BYD BeyondIT")
    {
        Caption = 'BeyondIT Apps';
    }
}
To create your own video category in the Assisted Setup page (maybe needed for filtering if you have dozens of apps of different vendors installed) you need to create another enum extension:

enumextension 50001 "BYD VideoCategoryBeyond" extends "Video Category"
{
    value(50001; "BYD BeyondIT App")
    {
        Caption = 'BeyondIT App';
    }
}
Remember to synchronize and translate the captions of this enum extensions.
Completed Checkbox
Last but not least we need to take care of the completed checkbox on the Assisted Setup page. The procedure to activate this checkbox is called CompleteAssistedSetup. The best place to put it correctly is the very last step when the setup wizard is completed by clicking on the finish button. The corresponding trigger would be OnAction.

trigger OnAction();
	var
		AssistedSetup: Codeunit "Guided Experience";
	begin
		FinishAction();
		AssistedSetup.CompleteAssistedSetup(ObjectType::Page, Page::"BYD Reports Setup Wizard");
	end;
}
Also very handy is the VS Code command "Format Document" (Shift + Alt + f).
If you liked this blog post let us know by clicking the heart icon or leave a comment.
You might also want to check out our other blog post.
Comentarios